Satin Stitch Petals: Smooth Edges and the Right Angle
How to fill flower petals with satin stitch: outline in split stitch, start in the middle, keep the angle steady and know when a petal is too long for it.
Tutorial at a glance
Materials
- Six-strand cotton embroidery floss in one petal color
- Embroidery needle size 7 or 8
- 6 in (15 cm) hoop
- Water-soluble pen
- Small embroidery scissors
Satin stitch is a row of straight stitches laid so close together that the fabric disappears beneath them. The threads lie parallel and reflect light as one surface, which is where the sheen and the name come from. Petals suit it well: they are small, they have a clear direction of growth for the stitches to follow, and a solid block of color reads as a petal from across a room.
Thread, Needle and Fabric Tension
Use two strands of six-strand cotton embroidery floss for petals up to about 3/4 inch (2 cm) long. One strand gives the finest, most even surface on tiny petals but takes twice as long; three strands cover quickly and tend to look ridged. Cut a working length of about 18 inches (45 cm), pull the strands out one at a time and lay them back together so they sit flat instead of twisted. The thread guide shows how to separate strands without tangles. An embroidery needle in size 7 or 8 fits two strands.
The fabric has to be drum-tight. Satin stitches are long compared with most stitches, and any slack in the hoop turns into puckers once the piece is taken out. If the fabric gives when tapped, re-seat it as described in the guide on using an embroidery hoop.
Outline the Petal First
Stitch around the drawn petal in split stitch with the same two strands: short stitches of about 1/8 inch (3 mm), each one coming up through the middle of the stitch before it. The outline will be completely covered. Its job is to make a firm, slightly raised ridge that the satin stitches wrap over, so every stitch turns at the same height and the edge comes out as a clean line instead of a row of separate holes.
Stitching One Petal, Step by Step
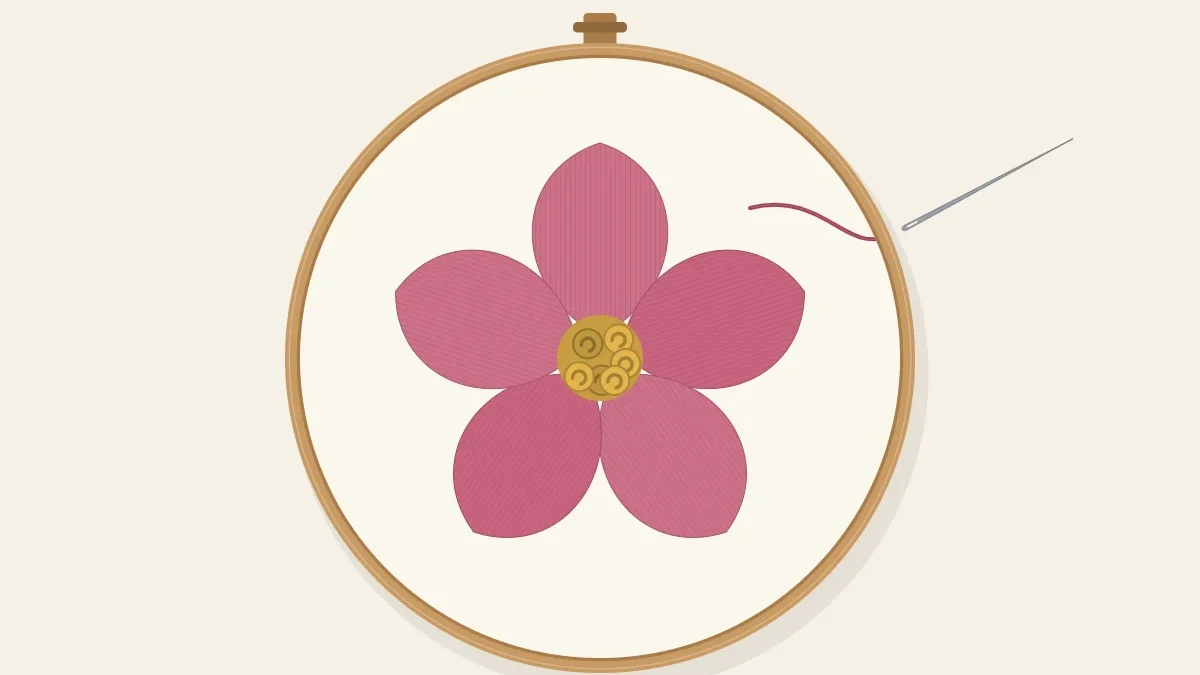
The practice petal here is a pointed oval 5/8 inch (1.5 cm) long and 3/8 inch (1 cm) wide, drawn with its base toward the flower center.
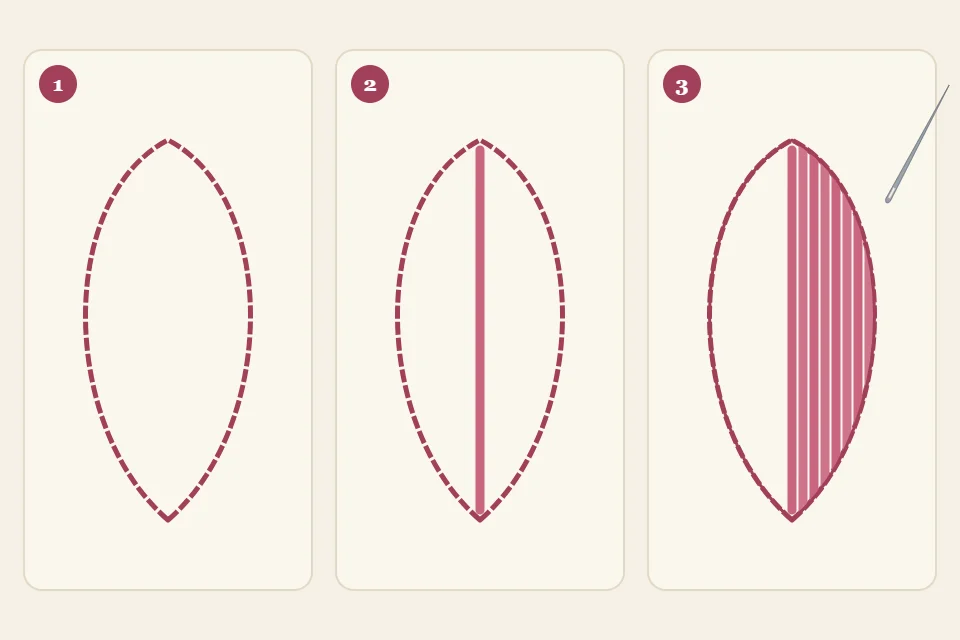
- Work the split-stitch outline. Go all the way around the shape, keeping the stitches on the drawn line. This is stage 1 in the diagram.
- Lay the middle stitch. Bring the needle up just outside the outline at the tip of the petal and take it down just outside the outline at the center of the base. This single stitch down the middle, stage 2, sets the direction for all the others.
- Fill out to one side. Come up at the tip end again, directly beside the first stitch, and go down at the base end beside it. Repeat, each stitch touching the last, until that half is covered, as in stage 3.
- Return to the middle. Slide the needle under the stitches on the back to get to the center, then fill the second half the same way, working outward.
- Fasten off. Run the thread under several stitches on the back and trim.
Always come up on one edge and go down on the opposite edge, so the thread also travels across the back.
Stitch Angle and Smooth Edges
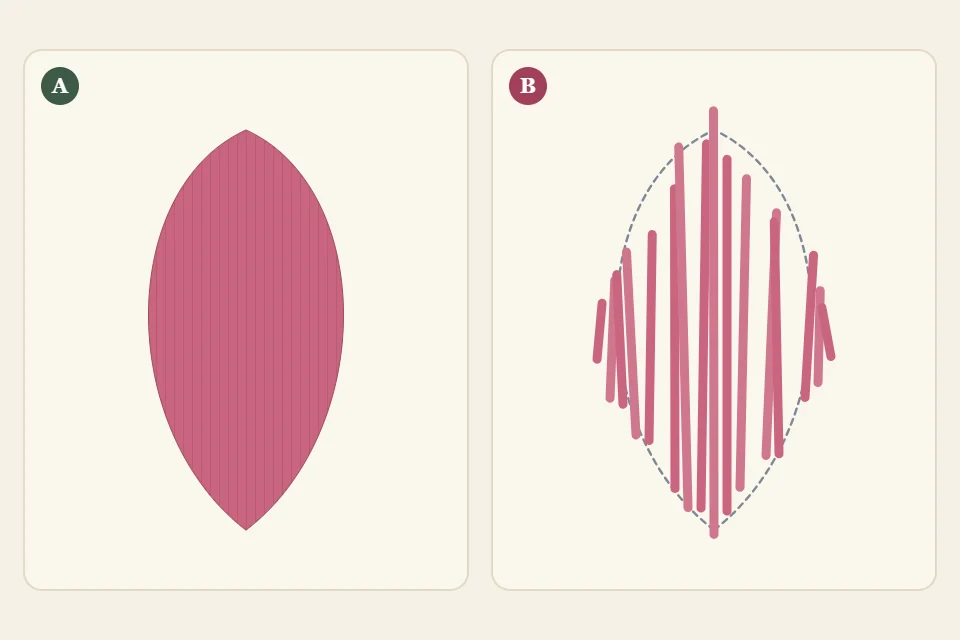
On a petal, stitches run from tip to base, pointing toward the center of the flower. Where the base is narrower than the middle there is not room for every stitch to end there, so let the outer stitches end on the side outline, slightly short of the base, and keep them as near parallel to the middle stitch as the shape allows. Petal A in the diagram shows the result: every stitch follows the direction of the petal and the edge is one unbroken curve.
Petal B shows the two common faults. Gaps appear when stitches are spaced by eye instead of placed right against each other, or when the thread has twisted into a cord that covers less. The ragged edge comes from the needle going in sometimes on the outline, sometimes outside it. Put the needle down against the outer side of the split-stitch ridge every time.
Tip
Let the needle hang free every four or five stitches so the floss untwists, and stroke each stitch flat with the side of the needle as you pull it snug.
How Long a Stitch Can Be
A long satin stitch is a loose loop waiting to snag. Treat 1/2 inch (12 mm) as the upper limit on a piece that will hang on a wall, and about 3/8 inch (1 cm) on anything that will be handled or washed.
| Petal length | Approach |
|---|---|
| Under 1/4 inch (6 mm) | Three or four straight stitches; an outline is not needed |
| 1/4 to 1/2 inch (6 to 12 mm) | Satin stitch over a split-stitch outline |
| 1/2 to 3/4 inch (12 mm to 2 cm) | Satin stitch for display pieces, or divide the petal down its center into two slanted halves |
| Over 3/4 inch (2 cm) | Long-and-short stitch |
Long-and-short stitch fills a large shape with staggered rows of shorter stitches, and it allows shading from one color to the next. The embroidered poppies project uses it for wide petals. For practice on a shape that sits comfortably inside the satin-stitch range, the easy tulip has three petals with the stitch direction marked.
Padding for Raised Petals
Padding lifts a petal off the fabric so its edges cast a slight shadow. After the outline, fill the inside of the shape with small straight stitches scattered in all directions, or with a loose layer of satin stitch worked across the petal at a right angle to the final direction. Then stitch the top layer as usual.
Troubleshooting
- Fabric puckers around the petal. The stitches are pulled too tight or the hoop is slack. Tighten the fabric and stop pulling as soon as the stitch lies flat.
- Stitches slowly fan out of line. Each stitch is angled a fraction more than the last. Lay a guide stitch every 1/8 inch (3 mm) across the empty area, then fill between the guides.
- Fabric shows through. Add a stitch into the gap by coming up between two stitches at the edge, or pad the next petal first.
- The surface looks dull and rope-like. The floss is twisted. Drop the needle to let it unwind, or restart with strands separated one by one.
Frequently asked questions
Should the outline be the same color as the satin stitch?
Yes, or a very close shade. The outline is meant to be covered, but a contrasting color can peek through between stitches at the edge.
Can I use all six strands to fill a petal faster?
It covers quickly, but six strands rarely lie flat side by side, so the surface looks lumpy. Two strands with more stitches give a smoother result.
Why does satin stitch use so much floss?
Each stitch crosses the shape on the back as well as the front, so the petal is effectively covered twice. Allow more thread than the area suggests.
Do I need to remove the pen lines before filling?
No. Stitch over them and rinse the finished piece, since the satin stitches cover the line and any trace beside them washes out afterward.