Easy Embroidered Tulip: Three Satin Stitch Petals
A tulip made from a three-petal satin stitch cup, a straight stem and two blade leaves. Draw the shape from the measurements given and stitch three in a row.

Tutorial at a glance
Materials
- Six-strand cotton embroidery floss in three flower colors
- Six-strand cotton embroidery floss in one or two greens
- Embroidery needles size 7 or 8
- 6-inch (15 cm) embroidery hoop
- 9-inch (23 cm) square of fabric
- Water-soluble pen and a ruler
- Small embroidery scissors
A tulip seen from the side is a cup made of three visible petals: one in front and one curving in from each side. Filled with satin stitch, those three shapes catch the light at slightly different angles, and that change in sheen is what separates the petals without any outlining. Add a straight stem and two long blade leaves and the flower is complete. This project sets three tulips in a row in a 6-inch (15 cm) hoop.
Materials and thread plan
Use a medium-weight, non-stretch cotton or cotton-linen blend in white or a pale neutral, cut about 9 inches (23 cm) square. Satin stitch shows every ripple in slack fabric, so tighten the hoop well.
| Part | Stitch | Strands | Needle |
|---|---|---|---|
| Petal outlines | Split stitch | 2 | Size 7 or 8 |
| Petals | Satin stitch | 2 | Size 7 or 8 |
| Stem | Stem stitch, two rows | 3 | Size 7 |
| Leaves | Stem stitch filling | 2 | Size 7 or 8 |
You need six-strand cotton embroidery floss in three flower colors, such as coral, yellow and pink, with a slightly darker shade of each if you want the front petal to stand out, plus one or two greens. Cut the floss to about 18 inches (45 cm).
Drawing one tulip
Test the water-soluble pen on a scrap, then draw the tulip in this order. Keep the cup small: at this size no satin stitch is longer than 5/8 inch (16 mm), which is close to the limit for a stitch that stays flat.
- Draw a guide box. Lightly mark a square 5/8 inch (16 mm) on each side. The whole cup fits inside it.
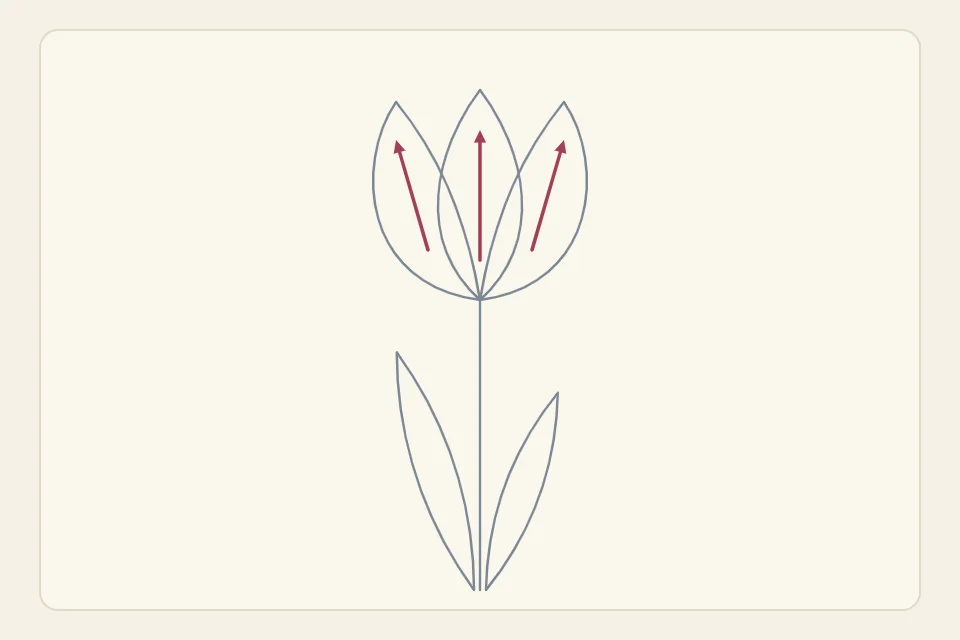
- Draw the front petal. In the middle of the box, draw a pointed oval 3/8 inch (10 mm) wide, running from the center of the bottom edge to the center of the top edge. Make it widest slightly above the middle, with a rounded base and a soft point at the top.
- Draw the side petals. From the base of the front petal, curve a line out to the side of the box and up to a point at the top corner, then bring it back in to meet the front petal about two thirds of the way up. Repeat on the other side. The two side petals should lean outward a little, like the rim of a cup.
- Draw the stem. From the base of the cup, draw a line 2 inches (5 cm) straight down.
- Draw the leaves. Starting at the bottom of the stem, draw a narrow blade on each side: 1 1/2 inches (3.8 cm) long, 1/4 inch (6 mm) across at its widest, tapering to a point and bending gently away from the stem. Make one leaf a little shorter than the other.
Placing three tulips in the hoop
Mark the center of the fabric. Draw the middle tulip so the top of its cup is 1 5/8 inches (4.1 cm) above the center, and give it a slightly longer stem of 2 1/4 inches (5.7 cm). Draw the other two tulips 1 1/8 inches (2.9 cm) to the left and right, with the tops of their cups 1 3/8 inches (3.5 cm) above the center. All three stems end on the same level. To refine the shape on paper first, see the article on drawing flower embroidery patterns.
Stitching the petals
The order matters: the two side petals go in first and the front petal last, so its edges sit on top.
- Outline each petal in split stitch. With two strands of the flower color, work small split stitches, about 1/8 inch (3 mm) long, along every drawn petal line. The outline gives the satin stitches a firm edge to wrap over.
- Fill the left side petal. Bring the needle up just outside the outline at the petal tip and take it down at the base of the cup. This first stitch follows the arrow in the diagram. Work outward from it to one side, then return to the middle and fill the other side. Let the stitches fan very slightly so they converge toward the base, and tuck the inner ones just under the front petal line.
- Fill the right side petal. Repeat as a mirror image.
- Fill the front petal. Start with one stitch from the tip straight down to the base, then fill to the left and to the right. Come up and go down just outside the split-stitch outline so it is completely covered.
For more contrast, use the darker shade for the side petals and the lighter one for the front. Edges, stitch angle and padding are covered in depth in the guide to satin stitch petals.
Watch out
Do not enlarge the cup beyond about 3/4 inch (2 cm) and keep using plain satin stitch. Longer stitches sag and snag. For a bigger tulip, fill the petals with two rows of long-and-short stitch instead.
Stem and leaves
Work the stem in stem stitch with three strands of green, from the bottom up to the cup, then stitch a second row tight against the first. Two rows give the thick, fleshy stalk a tulip has. End the top stitches under the base of the petals.
The blade leaves are filled lengthwise. With two strands, stitch a row of stem stitch along one edge of the leaf from base to tip. Go back to the base and work another row right beside it, and continue until the shape is full; a 1/4-inch (6 mm) leaf takes four or five rows. Using a lighter green for the one or two center rows suggests the fold down the middle of a tulip leaf. If you prefer a leaf with a visible vein, fishbone stitch leaves can be stretched to this long, narrow shape.
Troubleshooting
- The petals blur into one shape. The stitch directions are too similar. Lean the side-petal stitches outward more, or stitch a single strand of a darker shade along the two edges of the front petal.
- Wavy petal edges. The needle is wandering either side of the outline. Come up and go down tight against the outside of the split stitches every time.
- Fabric shows between stitches. Lay each stitch directly beside the last without overlapping. A gap can be closed with a single-strand stitch slipped in between.
- Puckering across the cup. The tension is too tight. Unpick the petal, retighten the hoop and let the stitches rest on the surface.
Frequently asked questions
Why stitch the side petals before the front petal?
Whatever is stitched last sits on top. Working the front petal last lets its edges overlap the side petals slightly, which gives a clean line and a sense that it is closest to the viewer.
Can I skip the split-stitch outline?
You can, but the edges will be harder to keep even. The outline takes a few minutes per tulip and gives each satin stitch a ridge to turn over, so beginners usually get a neater result with it.
What colors work for embroidered tulips?
Almost any: red, yellow, pink, coral, purple and white are all common in real tulips. Choosing three colors that sit close together, such as pink, coral and yellow, keeps a row of three looking unified.
How do I embroider an open tulip instead of a closed cup?
Draw the side petals leaning further outward and separate their tips from the front petal by about 1/8 inch (3 mm). The stitching order and directions stay the same.