Embroidered Leaves: Fishbone Stitch Step by Step
Fishbone stitch fills a leaf and forms its center vein at the same time. Learn the stitch in three stages, then compare it with satin, fly-stitch and lazy daisy leaves.

Tutorial at a glance
Materials
- Six-strand cotton embroidery floss in one or two greens
- Embroidery needle size 7 or 8
- 6-inch (15 cm) embroidery hoop
- Water-soluble pen or sharp pencil
- Small embroidery scissors
Fishbone stitch fills a leaf and draws its center vein in the same pass. Slanted stitches are laid from alternate edges, and each one ends a hair past the middle of the leaf, so the two sides overlap in a neat braided ridge. There is no outline to stitch first and no separate vein to add afterward, which is why it is the leaf most stitchers reach for once flowers start needing foliage.
What you need and how to draw the leaf
Use two strands of six-strand cotton embroidery floss in an embroidery needle size 7 or 8, cut to about 18 inches (45 cm). Three strands give a chunkier leaf and fill faster. Work on medium-weight, non-stretch cotton or cotton-linen held drum-tight in the hoop.
For a practice leaf, draw a pointed oval 1 inch (2.5 cm) long and 1/2 inch (12 mm) across at its widest point, with the widest part slightly below the middle. Draw a line from the tip to the base for the center vein. That line is the only guide the stitch really depends on, so make it clear.
Fishbone stitch step by step
The three numbered stages in the diagram below match these three steps.
- Make the tip stitch. Bring the needle up exactly at the tip of the leaf and take it down on the center line about 1/4 inch (6 mm) below. This single straight stitch sets the point of the leaf and gives the first slanted stitches something to cross.
- Alternate slanted stitches across the center. Come up on the left outline, right beside the top of the tip stitch. Go down just to the right of the center line, immediately below the end of the tip stitch. Now come up on the right outline beside the tip and go down just to the left of the center line, directly under the stitch you just made. Keep alternating left, right, left, right. Each stitch starts on the outline snug against the one above it and ends about one thread-width past the center line, so every new stitch crosses the foot of the last.
- Fill to the base and finish. Continue down the leaf, letting the stitches get longer as the leaf widens and shorter again as it narrows. Keep the slant steady rather than letting it flatten out. The last pair of stitches should close the base completely. Take the needle to the back, slide it under several stitches on the reverse and trim.

Getting the angle and the overlap right
Two things decide how a fishbone leaf looks. The first is the slant. Stitches that run at roughly 45 degrees to the center line give the classic leaf with a clear vein. A steeper slant makes a slimmer, sharper leaf; a shallow slant looks more like plain satin stitch with a seam.
The second is how far each stitch crosses the center. A tiny overlap, one or two fabric threads, makes a fine vein. Crossing further, about 1/16 inch (1.5 mm), raises a bolder plaited ridge. Whichever you choose, keep it the same from tip to base.
Four ways to stitch a leaf
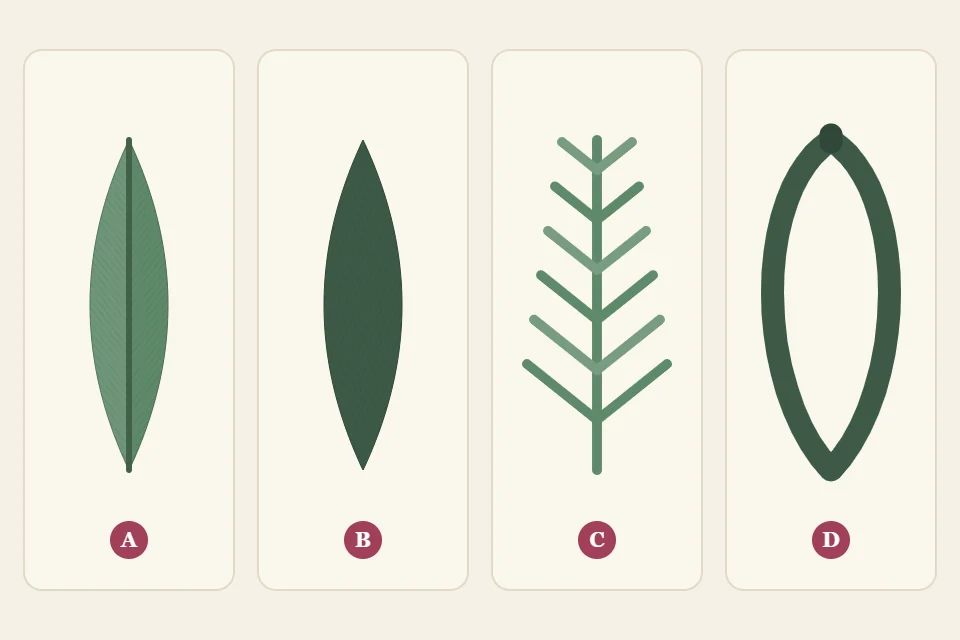
Fishbone is not always the right leaf. The diagram shows the four types most useful for floral work, labeled A to D.
| Leaf | Best size | Strands | Use it for |
|---|---|---|---|
| A. Fishbone | 1/2 to 1 1/2 inches (12 to 38 mm) | 2 or 3 | Rose, poppy and sunflower leaves with a visible vein |
| B. Satin stitch | Up to 1/2 inch (12 mm) wide | 2 | Smooth, glossy leaves and narrow blades |
| C. Fly-stitch fern | Any length, about 1/2 inch (12 mm) wide | 1 or 2 | Ferns, airy filler and greenery behind flowers |
| D. Lazy daisy | 1/4 to 1/2 inch (6 to 12 mm) | 2 or 3 | Tiny leaves on stems and sprigs |
Satin leaves (B) are stitched at a slant from edge to edge with no center crossing, starting in the middle of the shape and working toward each end. They look sleek but show every uneven edge, so a split-stitch outline underneath helps. The method is the same one used for satin stitch petals.
Fly-stitch ferns (C) start with a short straight stitch at the tip. Below it, make a row of open V shapes: up on the left, down level with it on the right leaving a loose loop, then up on the center line below to catch the loop and down again a little lower to hold it. Each holding stitch becomes a section of the central rib.
Lazy daisy leaves (D) are one detached chain stitch each, quick enough to scatter dozens along a stem. For a fuller leaf, add one straight stitch inside the loop. The loop itself is explained in the guide to lazy daisy stitch.
Attaching leaves to stems
Stitch the stem first, then the leaves, so each leaf base can sit on top of the stem line and hide the join. A stem worked in stem stitch with two or three strands is the usual partner.
- Directly on the stem. Angle the leaf 30 to 45 degrees away from the stem, pointing toward the growing tip, and end the last fishbone stitches right against the stem line.
- On a short stalk. Work two or three stem stitches out from the main stem, about 1/8 to 1/4 inch (3 to 6 mm), and begin the leaf at the end. This suits rose leaves and anything meant to look loose.
- In pairs or alternating. Opposite pairs look formal; leaves staggered up the stem look more natural. Mix two greens on one branch for depth.
Troubleshooting
- A bare gap down the center. The stitches are stopping on the line instead of crossing it. Take each one a thread or two past the center.
- A jagged, stepped edge. The needle is coming up inside or outside the drawn outline. Come up exactly on the line, tight against the previous stitch.
- The slant flattens toward the base. This happens when the outer ends move down the edge faster than the center ends. Drop the center end of each stitch a little further down the vein to restore the angle.
Once the rhythm is familiar, a pair of fishbone leaves makes a good finish for a woven wheel rose, where the flat, veined leaf contrasts with the raised flower.
Frequently asked questions
Do I need to outline a fishbone leaf before filling it?
No. The stitches themselves form the edge, so a drawn outline is enough. Outlining afterward in a darker green is optional and gives a more graphic look.
Can fishbone stitch be used for flower petals?
Yes. It works well for pointed petals and bracts, such as those on a poinsettia, where a center crease suits the shape. Rounded petals usually look better in satin stitch.
What is the difference between fishbone stitch and fly stitch for leaves?
Fishbone stitches are packed side by side to make a solid leaf. Fly stitches are open V shapes held by a small stitch at the center, so the fabric shows between them and the leaf looks feathery.
How small can a fishbone leaf be?
Below about 3/8 inch (10 mm) long there is too little room for the alternating stitches to read as a vein. For leaves that small, a single lazy daisy stitch is quicker and neater.