Lazy Daisy Stitch: Petals, Leaves and Simple Flowers
The lazy daisy, or detached chain stitch, makes a petal from one loop and one tacking stitch. Learn the steps, how tension shapes the loop, and how to space a flower.

Tutorial at a glance
Materials
- Six-strand cotton embroidery floss in a petal color and a green
- Embroidery needle size 7
- Water-soluble pen
- 6 in (15 cm) hoop
- Small embroidery scissors
A lazy daisy is one chain stitch standing by itself, which is why its other name is detached chain. The thread makes a loop on the surface, and a tiny straight stitch over the far end of the loop pins it in place. That one teardrop is already a petal. Five or six of them around a point make a flower, and a single one beside a stem makes a leaf, so this stitch covers a large share of simple floral work with only two needle movements to learn.
Thread and Needle
Three strands of six-strand cotton embroidery floss on an embroidery needle size 7 suit petals between 3/8 and 1/2 inch (1 to 1.2 cm) long. Drop to two strands for petals under 3/8 inch, where three would close up the loop. All six strands on a size 5 needle make bold, rope-like petals for larger flowers. Cut the floss about 18 inches (45 cm) long; a loop stitch drags more thread through the fabric than it seems to, and long lengths fray before they are used up.
One Petal, Step by Step
Mark two dots 3/8 inch (1 cm) apart. Call the one at the base of the petal A and the one at the tip B.
- Come up at A. Bring the needle up at the base and pull the thread all the way through, as in panel 1.
- Go down at A and up at B. Put the needle back into the same hole at A, or one fabric thread beside it, and bring the tip out at B without pulling through yet. Lay the working thread under the needle tip, from one side to the other, as in panel 2.
- Draw the loop closed. Pull the needle through, moving it away from A. The loop shrinks toward B; stop when it lies flat on the fabric and still has a rounded shape.
- Tack the loop. Take the needle down just outside the loop at B, making a very short stitch over the thread. Panel 3 shows this tacking stitch holding the tip in place.

Loop Tension Shapes the Petal
How far the loop is pulled before it is tacked decides everything about how the petal looks. The same two dots can give three different petals.
| Loop tension | Result | Good for |
|---|---|---|
| Pulled until it just lies flat | Open, rounded teardrop | Daisy petals, broad leaves |
| Pulled a little farther | Narrow petal with nearly straight sides | Asters, grass-like leaves |
| Pulled tight | Two threads lying side by side, no open center | Tiny buds, seed-like fillers |
Whichever shape you choose, pull every loop in a flower the same amount. The tacking stitch should be only about two fabric threads long. A longer one changes the look of the stitch, which is useful when done on purpose and is described further down.
Tip
Hold the loop flat with the thumb of your free hand while you pull the last inch of thread through. It stops the loop from twisting into a figure eight.
Building a Flower Around a Center
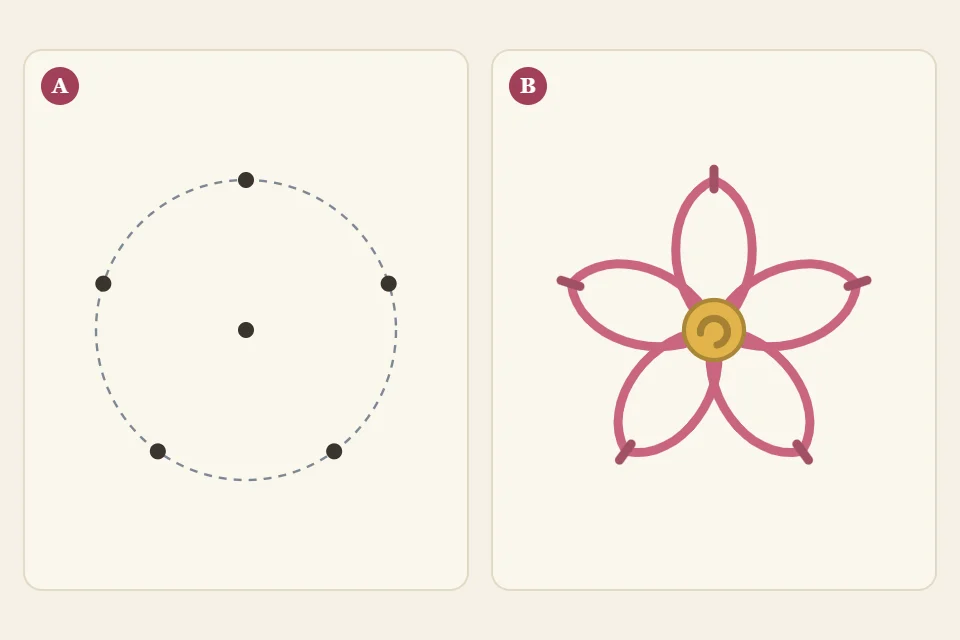
Petals drift when they are placed by eye, so mark the spacing first. Draw a center dot, then five dots around it, each 3/8 inch (1 cm) from the center and evenly spaced like the points of a star. Stage A of the diagram shows this guide. Each outer dot is point B for one petal.
Start every petal a short distance from the center dot instead of on it, leaving an unstitched circle about 1/8 inch (3 mm) across. Five petals that all share one hole pile up into a lump and leave no room for a center. Work around the ring in order, turning the hoop so each petal points away from you as you make it. The result is stage B: five even petals with a small gap in the middle, ready for a cluster of French knots.
For six or eight petals, mark the dots in opposite pairs, like the 12 and 6 on a clock first, then fill in between. The easy embroidered daisy project puts this flower on a stem with leaves as a full design.
Leaves, Buds and the Long-Tailed Variation
A single lazy daisy in two strands of green is the quickest leaf there is. Place A on the stem and B out to the side, angled upward in the direction the plant grows, and stagger the leaves from one side of the stem to the other. This works for leaves up to about 1/2 inch (1.2 cm); larger leaves need a filled stitch, and fishbone stitch leaves cover that range.
Three variations use the same movements:
- Long-tailed lazy daisy. Make the tacking stitch long, 1/4 inch (6 mm) or more, so the loop sits on a stalk. Pointed outward it suggests a bud on a stem; with the tails pointing to the center it gives a starry flower with spaces between the petals.
- Double lazy daisy. Work a small loop in a light shade, then a larger loop around it in a darker one. The petal looks filled without any satin stitching.
- Filled loop. Add one straight stitch down the middle of an open loop, in the same color or a paler one.
Small loops stacked in pairs up a stem also make a convincing flower spike, which is one of the options in the easy embroidered lavender project.
Troubleshooting
- The loop disappears into a straight line. It was pulled too hard before tacking. Unpick the tacking stitch, tease the loop open with the needle tip and tack it again.
- The loop will not close at all. The working thread was not under the needle tip when it came out at B. Take the needle out and repeat the second step.
- The petal leans to one side. The tacking stitch went in beside the tip instead of directly beyond it. Put the needle down in line with A and B.
- Petals are different lengths. They were spaced by eye. Mark the outer dots, or rinse and re-mark a flower that has gone wrong.
- A dark line shows between petals on pale fabric. Thread carried across the back is shadowing through. Travel around the ring behind the petals, not across the open center.
Frequently asked questions
Is lazy daisy the same as chain stitch?
It is one link of chain stitch finished off by itself. In a chain, the next stitch starts inside the loop; in a lazy daisy, a small tacking stitch closes it instead.
How many petals should a lazy daisy flower have?
Five is the easiest to space and reads clearly as a flower. Six to eight petals work for larger flowers, as long as you leave a wider gap in the center.
Can I stitch lazy daisies on clothing?
Yes, if the loops are kept short, about 3/8 inch (1 cm) or less, so they do not catch. Longer loops are better kept for hoop pieces.
Should I stitch the center before or after the petals?
Petals first. The center then covers the inner ends of the petals and hides any small unevenness where they meet.