How to Draw Your Own Flower Embroidery Patterns
Build simple flower designs from circles and guide lines, turn one flower into front, side and bud views, and size every detail so it can actually be stitched.

Tutorial at a glance
Materials
- Plain paper
- Soft pencil and eraser
- Ruler
- Coins, buttons or a circle template to trace around
- Fine black pen
- The embroidery hoop the design is meant for
An embroidery pattern is a map for thread, not a finished drawing. It needs only the lines a needle will follow: where a petal starts and stops, where a stem bends, where a knot sits. That is good news for anyone who feels they cannot draw, because nearly every simple flower can be built from a circle, a dot and a few straight guide lines.
Tools for drawing patterns
- Plain paper and a soft pencil with a good eraser
- A ruler marked in inches and millimeters
- Something round to trace: coins, buttons, a thread spool, or a circle template
- A fine black pen for the final lines, so they show clearly when you trace them onto fabric
- The hoop you plan to use, to draw around as a boundary
Trace the inside of the hoop’s inner ring onto the paper first. Everything you draw should stay at least 1/2 inch (1.2 cm) inside that line, because it is awkward to stitch right up against the hoop.
Build a flower from a circle
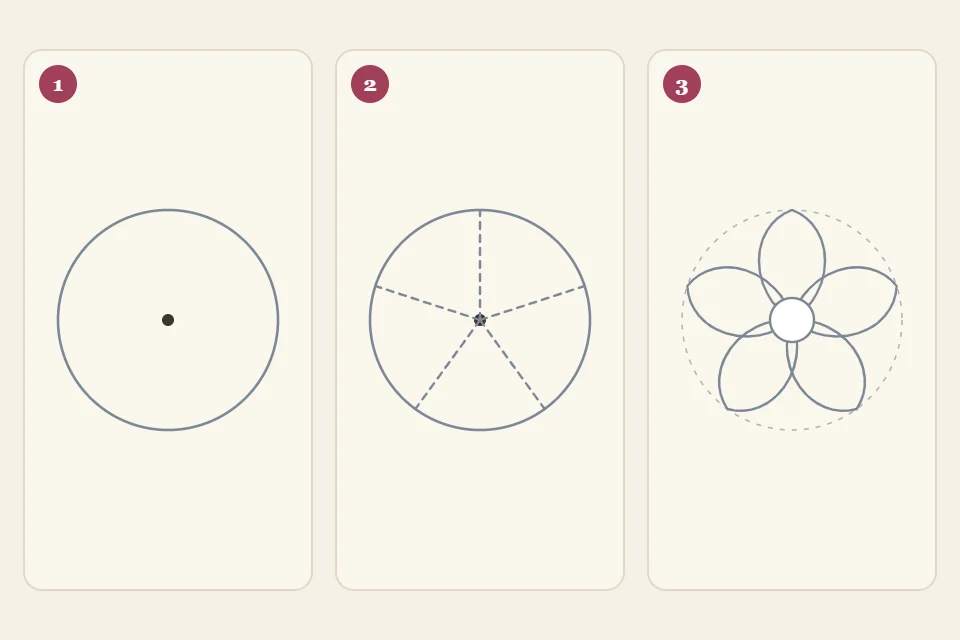
A five-petal flower is the most useful shape to learn, since it turns into daisies, blossoms, wild roses and forget-me-nots with small changes. Draw it in three stages.
- Draw a circle with a center dot. Trace a circle 1 inch (2.5 cm) across and mark the middle with a dot. The circle sets the size of the whole flower; the dot keeps every petal aimed at the same point.
- Divide the circle with five guide lines. Draw five light lines from the dot to the circle, splitting it into five equal wedges. To space them without a protractor, picture a starfish or a person standing with arms and legs spread: one line straight up, two “arms” pointing slightly above level to the left and right, and two “legs” pointing down and apart.
- Draw one petal in each wedge. Start at the dot, curve out until you nearly touch one guide line, round the tip against the circle, and curve back to the dot along the next guide line. Repeat four times, add a small center circle about 3/16 inch (5 mm) across, then erase the outer circle and the guide lines.
Draw the same flower three ways
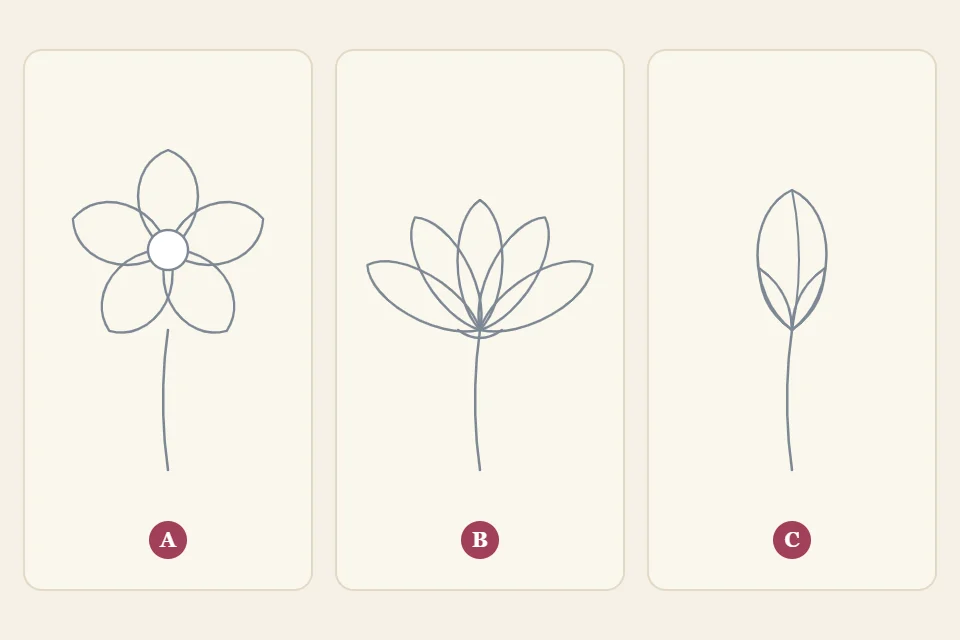
A design made only of front-facing flowers looks stamped. Turning one flower in different directions gives variety without adding new shapes to learn.
- A, facing front. The full circle version from the steps above. All petals are the same length and the center sits in the middle.
- B, from the side. Replace the circle with a flattened oval, about 1 inch (2.5 cm) wide and 1/2 inch (1.2 cm) tall, or with a fan shape. Draw three petals fanning upward from a point at the bottom, the middle one tallest. Add a small cup shape under them where the petals join the stem.
- C, as a closed bud. Draw a teardrop about 3/8 inch (1 cm) tall with the point up. Add two short curved lines hugging its base for the sepals, then the stem.
Simplify for stitching
The most common mistake in a first pattern is too much detail. Before inking a drawing, check it against these points:
- One line, one row of stitches. Every drawn line will become a line of thread roughly 1/16 inch (1.5 mm) wide. Two lines closer together than that merge into one.
- Close every shape you plan to fill. A petal for satin stitch needs a complete outline, with no gaps where it meets the center.
- Remove what thread can suggest. Petal veins, stamens and leaf serrations are usually better left off the drawing and added freehand as a few straight stitches.
- Prefer smooth curves to tight wiggles. A wavy petal edge with bumps smaller than 1/8 inch (3 mm) cannot be followed by a needle and will come out lumpy.
Minimum sizes for details
These are practical rules of thumb for six-strand cotton embroidery floss on medium-weight cotton. Finer fabric and a single strand allow smaller details; heavier thread needs more room.
| Detail | Workable size | Why |
|---|---|---|
| Satin stitch petal | At least 1/8 in (3 mm) wide; stitches no longer than about 1/2 in (1.2 cm) | Narrower shapes lose their outline; longer stitches snag and sag |
| Lazy daisy petal | 1/4 to 1/2 in (6 to 12 mm) long | Shorter loops close into a knot; longer ones flop |
| Woven wheel circle | 3/8 to 1 in (1 to 2.5 cm) across | Smaller leaves no room to weave; larger leaves long loose spokes |
| French knot dot | Dots at least 1/8 in (3 mm) apart | Closer dots crowd unless a packed center is the goal |
| Fishbone leaf | At least 3/8 in (1 cm) long | Needs space for several pairs of slanted stitches |
Draw for the stitch you plan to use
Different stitches want different marks, so decide on the stitch before finishing the drawing. A pattern drawn for the wrong stitch leaves visible pen lines or gives the needle nothing to aim for.
- Satin stitch: draw the full closed outline of each shape and add one or two small arrows inside it for stitch direction. The article on satin stitch petals explains how to choose that angle.
- Lazy daisy: do not draw petal outlines at all. Mark a center dot and one dot at each petal tip, which is all the lazy daisy stitch needs.
- Woven wheel: draw only a circle and a center dot. The five spokes of a woven wheel are stitched by eye and the weaving hides everything else.
- French knots: mark single dots.
- Stem stitch and backstitch: a single line. Keep curves wider than a 1/4-inch (6 mm) circle so the stitches can turn smoothly.
- Fishbone leaves: the leaf outline plus a center vein line from tip to base.
Troubleshooting a drawn pattern
- Petals come out uneven. The guide lines were not evenly spaced. Redraw stage 2 and compare the wedges before drawing any petals.
- The design looked fine on paper but is cramped in thread. Check it against the minimum sizes, then enlarge the drawing on a copier or remove a flower.
From paper to fabric
Go over the final lines in black pen and write the stitch and number of strands beside each part. The methods for transferring the design to fabric depend on how light or dark the fabric is, and it is worth testing any marking pen on a scrap first.
Frequently asked questions
Can I draw the design straight onto the fabric instead of on paper?
Yes, with a water-soluble pen, and it works well for loose designs such as scattered sprigs. Paper is safer for anything symmetrical or measured, because pencil erases cleanly and fabric marks do not until the piece is rinsed.
How do I make a drawn flower bigger or smaller?
Redraw it starting from a larger or smaller circle, or resize the inked copy on a copier or scanner. After resizing, check the small details again, because a flower shrunk by half may have petals too narrow to fill.
Is it all right to copy a flower pattern I found somewhere?
Published patterns belong to the people who made them, so drawing your own from basic shapes or from a real flower is the simplest way to avoid the question. The stitches themselves are traditional and free for anyone to use.
How many flowers fit in a 6-inch hoop?
As a rough guide, three flowers about 1 inch (2.5 cm) across with stems and leaves fill a 6-inch (15 cm) hoop comfortably. Five or more works if most of them are smaller filler flowers.