Embroidered Poinsettia: A Layered Winter Flower in Three Stages
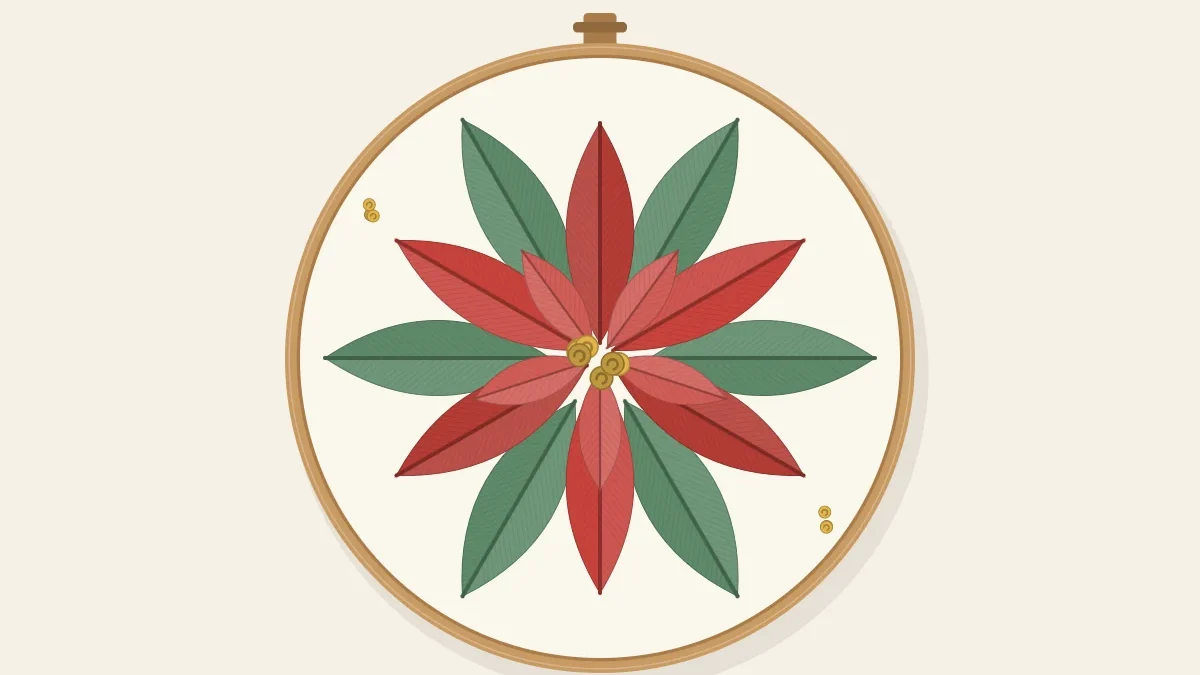
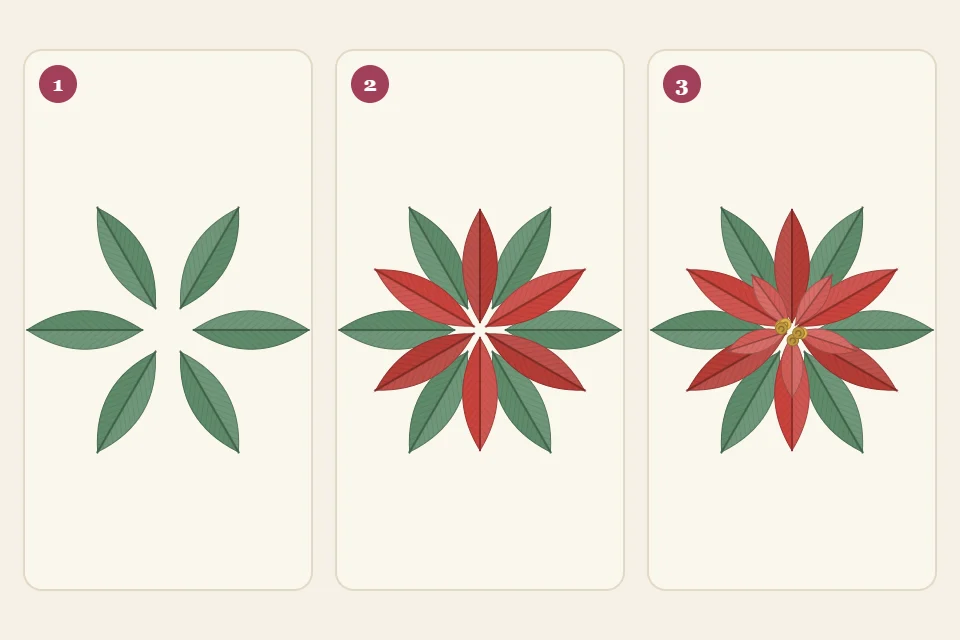
Stitch a poinsettia in three layers: green leaves at the back, six large red bracts over them, and five smaller bracts with gold French knots on top.
Tutorial at a glance
Materials
- 6-inch (15 cm) embroidery hoop
- 9-inch (23 cm) square of medium-weight cotton or cotton-linen blend
- Six-strand cotton embroidery floss: deep red, a lighter or brighter red, dark green, gold
- Embroidery needle, size 7
- Water-soluble pen and ruler
- Small embroidery scissors
The red “petals” of a poinsettia are not petals. They are bracts, colored leaves that surround the real flowers, which are the tiny yellow-green beads at the center. That is useful to know before stitching one, because it means the whole plant is made of a single shape: a pointed leaf, repeated in green at the back, in large red on top of that, and in small red on top again. Stitch the layers in that order and the flower builds its own depth.
Thread and fabric
Use six-strand cotton embroidery floss in deep red, a lighter or brighter red, dark green and gold, on white, cream or pale gray fabric in a 6-inch (15 cm) hoop. Cut the floss into lengths of about 18 inches (45 cm) and thread a size 7 embroidery needle: two strands for the leaves and bracts, three for the knots.
Watch out
Strong reds are the colors most likely to bleed onto pale fabric. Wet a short piece of the red floss, press it between layers of white scrap and let it dry before starting. The thread guide covers colorfastness in more detail.
Draw the design
The finished poinsettia is about 3 1/2 inches (9 cm) across. Every leaf and bract is the same outline, a pointed oval that is widest about one third of the way out from the center, with a vein line from base to tip.
- Mark the center. Draw a 3/8-inch (1 cm) circle in the middle of the fabric. Nothing but knots goes inside it.
- Draw six large bracts. Mark six points on the circle, evenly spaced like 12, 2, 4, 6, 8 and 10 on a clock. From each, draw a bract 1 1/4 inches (3.2 cm) long and 1/2 inch (1.2 cm) wide, pointing straight outward. Neighboring bracts will touch or slightly overlap near the center; that is fine.
- Draw five small bracts. Inside the ring of large ones, draw five bracts 3/4 inch (2 cm) long and 3/8 inch (1 cm) wide, evenly spaced around the center circle. Five will not line up with six, so each small bract covers a slightly different part of the layer beneath, which is what keeps the flower from looking like a wheel.
- Draw four green leaves. In four of the gaps between large bracts, draw the outer part of a leaf whose tip reaches 1 3/4 inches (4.5 cm) from the center. Only the outer 3/4 inch (2 cm) or so of each leaf will show.
Where shapes overlap on the drawing, erase the hidden part of the lower shape, so that each area on the fabric belongs to one layer only.
Stitch the three layers
Work from the back of the plant to the front. Each layer is stitched only where it shows, and the next layer’s edge slightly overlaps the one before to hide the join.
- Stitch the green leaves. Fill the four visible leaf sections with fishbone stitch in two strands of dark green. Start with a straight stitch from the tip down the vein line, about 1/4 inch (6 mm) long, then alternate slanted stitches from the left and right edges, each crossing just over the vein. Stop where the leaf disappears behind the bracts; the bottom edge can be rough because red will cover it.
- Stitch the six large red bracts. Work each in fishbone stitch with two strands of deep red, tip to base, bringing the edge stitches just over the ends of the green so no fabric shows between them. Where a bract runs under a small bract, stop at the drawn line. Stitch alternate bracts first, at 12, 4 and 8, then the three between them, so each has room to keep its shape.
- Stitch the five small bracts and the center. Fill the small bracts with the lighter red, again overlapping the layer below by a thread or two. Then fill the center circle with seven to nine French knots in three strands of gold, wrapped twice, packed so they touch.
The full method for the leaf stitch, including how steeply to slant it, is in the article on fishbone stitch leaves.
Fishbone or satin stitch for the bracts?
Either works. They give a different surface, and many stitchers use one for the large bracts and the other for the small ones to separate the layers.
| Fishbone stitch | Satin stitch | |
|---|---|---|
| Look | A raised center vein with stitches slanting out like a real leaf | A flat, glossy surface with no vein |
| Stitch length | Each stitch covers only half the width, about 1/4 inch (6 mm) | Each stitch crosses the full width, up to 1/2 inch (1.2 cm) |
| Edges | Forgiving; the slant hides small wobbles | Need a split-stitch outline to stay crisp |
| Best on | Large bracts and green leaves | Small top bracts, 3/8 inch (1 cm) wide or less |
For satin stitch bracts, outline the shape in split stitch with one strand, start with a stitch across the widest part and work out toward the tip, then return and fill toward the base, angling the stitches at about 45 degrees to the vein. The details are in the guide to satin stitch petals.
Finish the center
The knots are small but they are the focal point. Bring the needle up inside the circle, wrap the three strands around it twice, and go down next to the hole you came up from, not into it, while holding the thread taut. Work around the edge of the circle first and fill the middle last. For a more natural center, swap two or three of the gold knots for green ones, or add a single red knot. If knots give trouble, the French knot article goes through the usual causes.
Troubleshooting
- Fabric shows between the layers. The upper layer stopped at the drawn line instead of overlapping. Add a few extra stitches in the upper color, bringing the needle up in the lower layer’s edge.
- The bracts lose their points. The first stitch at the tip was too short. Start each bract with one stitch at least 1/4 inch (6 mm) long, exactly along the vein, with the needle coming up right on the tip.
- The flower looks flat and all one red. The two reds are too similar. Choose reds a clear step apart, with the lighter or brighter one on top.
Frequently asked questions
Can I use metallic thread for the gold center?
Yes, but metallic thread frays and twists more than cotton, so cut it shorter, about 12 inches (30 cm), and wrap the knots only once. Mixing one metallic strand with two cotton strands is easier to handle than metallic alone.
Will a poinsettia work on dark fabric?
It can look striking on navy or forest green, but the dark green leaves will fade into the background, so switch them to a lighter green. Use a white transfer method, since blue pen lines do not show on dark cloth.
How many bracts does a poinsettia need to look right?
There is no fixed number on a real plant. Six large and five small is easy to space and gives a full flower, but five and four, or seven and five, look just as convincing.
Is this project suitable for a complete beginner?
It is manageable after one or two simpler flowers. The stitches are basic, but filling eleven bracts neatly takes patience, so practicing a single fishbone leaf on a scrap first is worthwhile.