Cherry Blossom Branch Embroidery: Notched Petals, Stamens and Buds
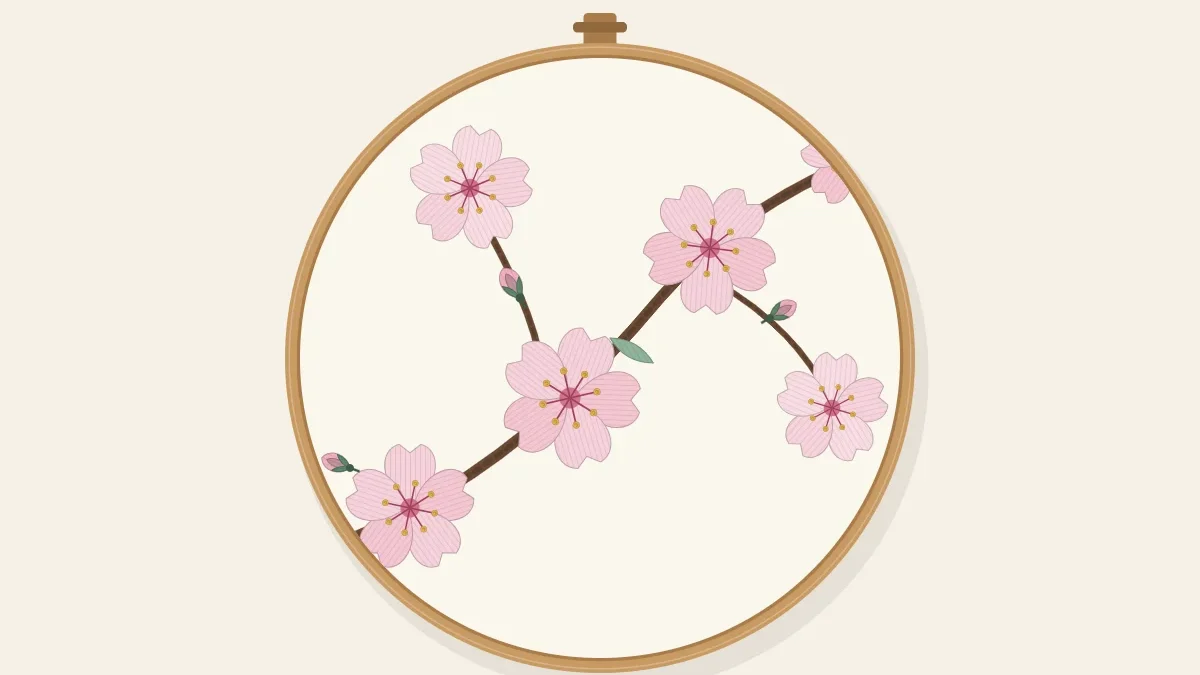
Stitch a spring branch with a kinked brown stem-stitch bough, five-petal blossoms with notched satin-stitch petals, fine stamens tipped with knots, and deep pink buds.
Tutorial at a glance
Materials
- 6-inch (15 cm) embroidery hoop
- 9-inch (23 cm) square of medium-weight cotton or cotton-linen blend
- Six-strand cotton embroidery floss: dark brown, pale pink, deep pink, soft green or reddish brown
- Embroidery needle, size 7, and a size 9 or 10 for single strands
- Water-soluble pen and ruler
- Small embroidery scissors
Two details separate a cherry blossom from any other five-petal flower: each petal has a small notch at its tip, and a spray of fine stamens stands up from the center. Put those on a dark, angular branch with a few tight buds and the result is unmistakably spring. The petals are small, so this is a quick project, but the notch and the stamens reward careful work with one or two strands.
Thread and fabric
The design fits a 6-inch (15 cm) hoop and needs six-strand cotton embroidery floss in dark brown, pale pink, deep pink, and a soft green or reddish brown for the bud bases. Use an embroidery needle size 7 for two and three strands and a size 9 or 10 for single strands. Pale pink disappears on white. A light blue, soft gray or natural linen-colored fabric makes the blossoms stand out; the guide to choosing colors explains how to test thread against fabric before starting.
Draw the branch and blossoms
- Draw the main branch. Start 1 inch (2.5 cm) in from the lower left of the hoop and draw a line about 4 1/2 inches (11.5 cm) long, rising to the upper right. Make it from three nearly straight sections with slight changes of angle between them, not one smooth curve; cherry branches grow in short, kinked lengths.
- Add two twigs. At the first bend, draw a twig 1 inch (2.5 cm) long angled upward. At the second bend, draw one 3/4 inch (2 cm) long on the opposite side.
- Place five blossoms. Draw five circles 3/4 inch (2 cm) across: one at the end of each twig, two sitting directly on the main branch near the bends, and one near the tip. Let two of them overlap slightly. Put a dot at the center of each.
- Draw the petals. Divide each circle into five equal wedges and draw one rounded petal in each, about 5/16 inch (8 mm) long. At the tip of every petal, draw a small V-shaped notch about 1/16 inch (1.5 mm) deep.
- Add three buds. Draw ovals 3/16 inch (5 mm) long on stalks of 1/4 inch (6 mm): one at the very tip of the branch and two along its upper side.
Stitch the branch
Use stem stitch in dark brown, with stitches about 1/8 inch (3 mm) long and the working thread kept on the same side of the needle throughout.
- Lower half of the main branch: two rows of three strands, worked snugly side by side, so the branch is thickest where it enters the design.
- Upper half: one row of three strands, continuing on from one of the two rows.
- Twigs and bud stalks: one row of two strands.
At each bend, end the line by taking the needle down on the corner and begin the next section from the same point. That keeps the angle crisp. Leave a gap in the branch wherever a blossom sits on top of it.
Stitch the notched petals
Each petal is filled with satin stitch in two strands of pale pink, with every stitch running from the outer edge toward the center dot.
- Outline if you like. A split-stitch outline in one strand, including the V of the notch, gives the satin stitch a firm edge to wrap over. On petals this small it is optional but helpful.
- Lay the middle stitch. Bring the needle up at the bottom of the notch and take it down just short of the center dot. This is the shortest stitch in the petal, and it fixes the notch in place.
- Fill one side. Bring the needle up on the outer edge beside the first stitch and go down near the center, fanning the stitches slightly. The stitch beside the notch starts higher than the middle one, forming one of the two rounded lobes. Shorten the last stitches as the petal narrows.
- Fill the other side. Return to the middle and work outward the same way to form the second lobe.
- Leave the center open. Stop all stitches about 1/16 inch (1.5 mm) from the center dot, leaving a small circle of fabric for the stamens.
Work around the flower one petal at a time. Where two blossoms overlap, stitch the back blossom first and complete only its visible petals. Advice on stitch angle and smooth edges is in the article on satin stitch petals.
Add the stamens
The stamens are what turn five pink petals into a cherry blossom, and they are worked on top of the finished satin stitch.
- Stitch the filaments. With one strand of deep pink, work six or seven straight stitches radiating from the center, each about 1/8 inch (3 mm) long. Vary the lengths a little and let them lie over the petals, not between them.
- Tip each one with a knot. At the outer end of every straight stitch, make a small French knot with one strand, wrapped twice. Bring the needle up at the end of the stitch and go down right next to that hole, holding the thread taut.
- Fill the center. Place one knot of two strands, wrapped once, in the middle to cover the ends of the filaments.

If the tiny knots slip through to the back or come out loose, the French knot guide covers both problems.
Stitch the buds
Each bud is three satin stitches in two strands of deep pink, laid side by side along the length of the oval, with the middle stitch slightly longer than the two beside it. Cup the base with a fly stitch in two strands of green or reddish brown: come up on one side of the bud’s base, go down on the other leaving a loose loop, come up at the bottom center inside the loop, and take the needle down 1/8 inch (3 mm) below to anchor it. That anchoring stitch joins the bud to its stalk.
Troubleshooting
- The notch closes up. The stitches on each side were angled into the V. Keep the two stitches beside the middle one clearly longer, and bring them up on the drawn outline, not inside it.
- Petals merge into one blob. Leave a hair’s width of fabric between neighboring petals, or outline each petal with one strand of deep pink in split stitch after filling.
- Stamens look heavy. Use a single strand and a fine needle. Two strands are too thick at this scale.
Frequently asked questions
Can I use lazy daisy stitch for the petals instead of satin stitch?
Yes, for a quicker, looser blossom. You lose the notch, so add the stamens and keep the petals short and round to hold on to the cherry blossom look.
Should cherry blossoms have leaves?
Many cherry trees flower before or just as the leaves open, so a branch with no leaves looks right. If the design feels bare, add two or three very small bronze-green leaves near the tip.
How do I stitch white cherry blossoms?
Use white or off-white floss on a colored fabric such as light blue or gray, and keep the stamens and buds pink so the flowers still have definition. A split-stitch outline in very pale pink helps separate white petals.
My single-strand thread keeps tangling. What helps?
Cut it shorter, around 12 to 14 inches (30 to 35 cm), and let the needle hang freely every few stitches so the thread can untwist. A finer needle also drags less through the satin stitch.