Floral Wreath Embroidery: Laying Out a Balanced Circle of Flowers
Draw a 4-inch guide circle, place three flower clusters at clock positions, and fill between them with leaves that all grow in the same direction.
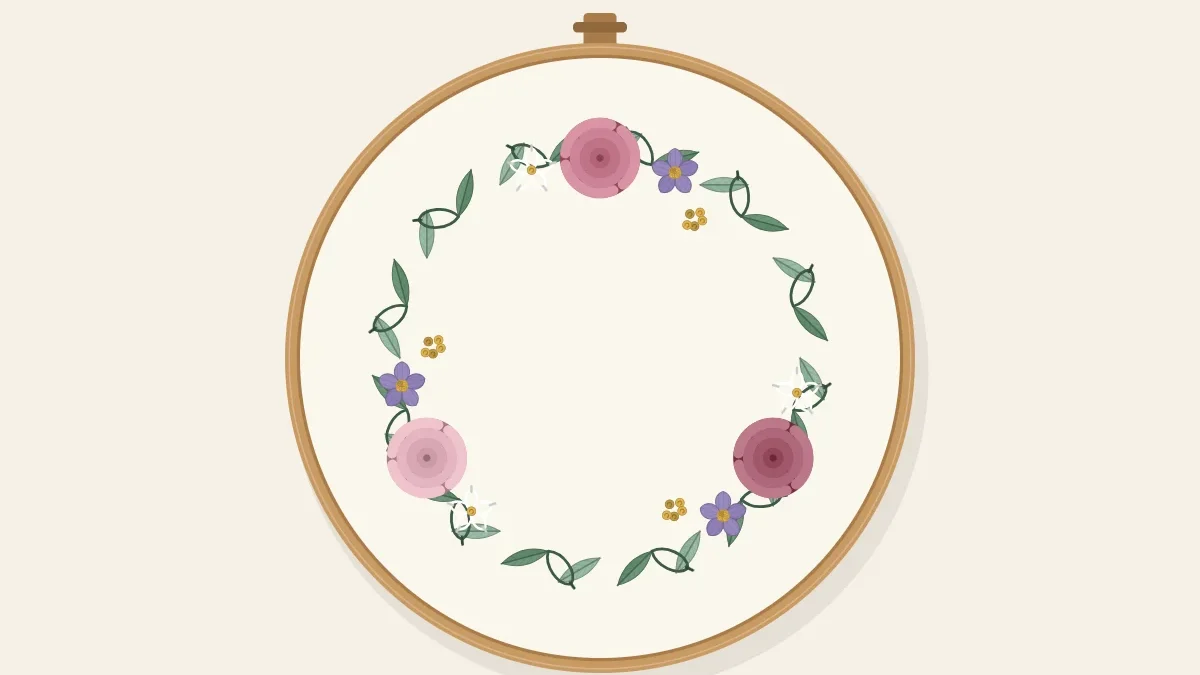
Tutorial at a glance
Materials
- Six-strand cotton embroidery floss in a light and a dark value of the main flower color
- Six-strand cotton embroidery floss in an accent color and yellow
- Six-strand cotton embroidery floss in two greens
- Embroidery needles size 5 and size 7
- 6-inch (15 cm) embroidery hoop
- Round object about 4 inches (10 cm) across for tracing
- Water-soluble pen
- Small embroidery scissors
A wreath is a line of flowers and leaves bent into a circle, and the circle does most of the design work. It frames the empty center and tells you where everything goes. Two decisions make the difference between a wreath that looks balanced and one that looks scattered: where the main flower clusters sit on the circle, and which way the leaves point.
Materials
- Medium-weight, non-stretch cotton or cotton-linen blend in a 6-inch (15 cm) hoop
- Six-strand cotton embroidery floss: a main flower color in a light and a dark value, one accent color, yellow, and two greens
- Embroidery needles size 5 and size 7
- Water-soluble pen, tested on a scrap first
- A round object about 4 inches (10 cm) across to trace, such as a mug or jar lid
Cut the floss about 18 inches (45 cm) long. Use three strands for the large flowers and two strands for everything else.
Draw the guide circle
Center the round object on the hooped fabric and trace around it lightly. A 4-inch circle inside a 6-inch hoop leaves 1 inch (2.5 cm) all around, enough room for leaves that reach outward without crowding the hoop’s edge.
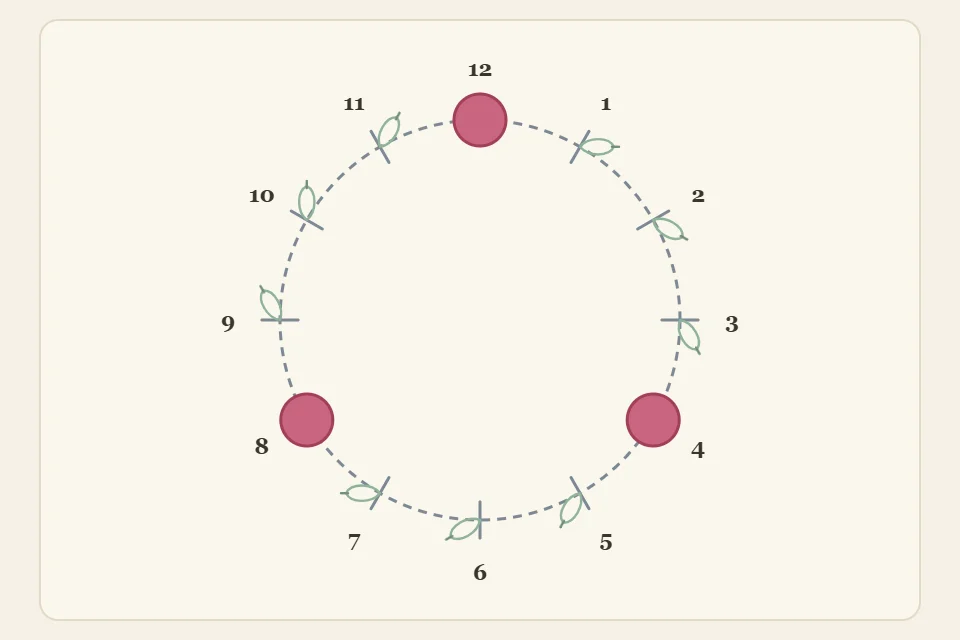
Think of the circle as a clock face. Make small tick marks at 12, 3, 6 and 9 by measuring straight up, down and across from the center. Then find 4 o’clock, which sits a third of the way from 3 down toward 6, and 8 o’clock, a third of the way from 9 down toward 6. Draw a larger dot, about 1/4 inch (6 mm), at 12, 4 and 8. These three points divide the ring into equal thirds and mark the focal flowers.
Between the dots, draw short leaf marks along the circle: pairs of 3/8-inch (1 cm) lines, one on the outside of the circle and one on the inside, set about 1/2 inch (12 mm) apart. Five pairs fit comfortably in each of the three sections.
Why 12, 4 and 8
Three clusters give the wreath a rhythm that two or four do not. Two opposite clusters split the circle into halves and look static; four make a square. Three equal spaces keep the eye moving around the ring. Putting one cluster at 12 gives the design an obvious top, which matters when the finished hoop is hung on a wall.
Build each focal cluster
A cluster is one large flower with smaller ones on either side, so that it tapers into the leaves instead of stopping abruptly.
| Element | Position | Size | Stitch |
|---|---|---|---|
| Focal flower | Centered on the dot at 12, 4 or 8 | 5/8 inch (1.5 cm) across | Woven wheel rose, three strands |
| Side flowers | One on each side, touching the circle line | 3/8 inch (1 cm) across | Five detached chain petals and a French knot center, two strands |
| Buds | One beyond each side flower | 1/8 inch (3 mm) | Group of three French knots, two strands |
Draw a 5/8-inch circle around each focal dot before you stitch. The roses are made with the woven wheel stitch on five spokes; use the dark value for the spokes and the first few rounds and the light value for the outer rounds. Work the side flowers in the accent color with yellow knots at their centers.
Keep the direction of growth consistent
Real stems grow in one direction, and leaves angle toward the growing tip. A wreath looks natural when its leaves obey the same rule. There are two sound options:
- One direction all the way around. Every leaf tip leans clockwise, as if a single vine had been wound into a ring. This suits the 12, 4 and 8 layout and is the one used here.
- Two halves meeting at the top. Leaves on the right side lean counterclockwise and those on the left lean clockwise, so both sides grow up from 6 toward 12. This suits a symmetrical wreath with a single cluster at the bottom or top.
Choose one and apply it to every leaf, bud stem and tendril. Angle each leaf mark about 45 degrees from the circle line with its tip leaning clockwise.
Stitch order
- Stitch the circle. Work the guide line in stem stitch with two strands of the darker green, traveling clockwise. Keep stitches no longer than 1/8 inch (3 mm) so the curve stays smooth, and skip the parts that will lie under the three focal flowers.
- Work the three focal flowers. Stitch all three roses before anything else in the clusters, so they match in size.
- Add the side flowers and buds. Complete one cluster, then repeat it at the other two positions.
- Fill with leaves. Stitch the marked pairs as fishbone stitch leaves, 3/8 inch long, with two strands. Alternate the two greens from pair to pair, and tuck one extra leaf under the edge of each rose.
- Check the gaps. Hold the hoop at arm’s length. Where the fabric shows more than 1/2 inch of bare circle line, add a single leaf or a three-knot bud.
Tip
Keep the band of stitching about 3/4 inch (2 cm) wide all the way around, with as much reaching inside the line as outside it. That leaves a clear center roughly 2 1/2 inches (6.5 cm) across.
Troubleshooting
- The circle looks angular. The stem stitches are too long for the curve. Shorten them, and keep the thread on the outside of the curve.
- One section is heavier than the others. Count the leaves in each third. They should match within one leaf.
- The wreath has turned into an oval. The fabric was pulled unevenly after the circle was drawn. Loosen the hoop, ease the fabric until the tick marks at 12, 3, 6 and 9 are the same distance from the center, and retighten.
- Clusters look stuck on. There is a sharp jump from big flowers to bare stem. Add a bud and a small leaf at each end of the cluster to step the size down.
Using the open center
The clear space in the middle can stay empty, or it can hold a short word, a date or a single letter no taller than 1 1/2 inches (4 cm), outlined in stem stitch with two strands. Stitch it after the wreath. When the piece is done, the guide to finishing an embroidery hoop covers rinsing out the pen marks and closing the back for display.
Frequently asked questions
How big should the wreath circle be for my hoop?
A circle about two-thirds the diameter of the hoop works well: 4 inches in a 6-inch hoop, or roughly 5 1/4 inches in an 8-inch hoop. That leaves a margin for leaves that reach outward.
Does the wreath have to be a closed circle?
No. An open wreath that stops short at the top, leaving a gap of an inch or so, is a common variation. In that case use the two-halves direction of growth so both ends point toward the gap.
Can I skip the stitched circle line?
Yes, if the leaves and flowers are close enough to suggest the ring on their own. Space the leaf pairs about 3/8 inch apart instead of 1/2 inch, and rinse out the drawn line when you finish.