Easy Embroidered Daisy: A First Flower Project
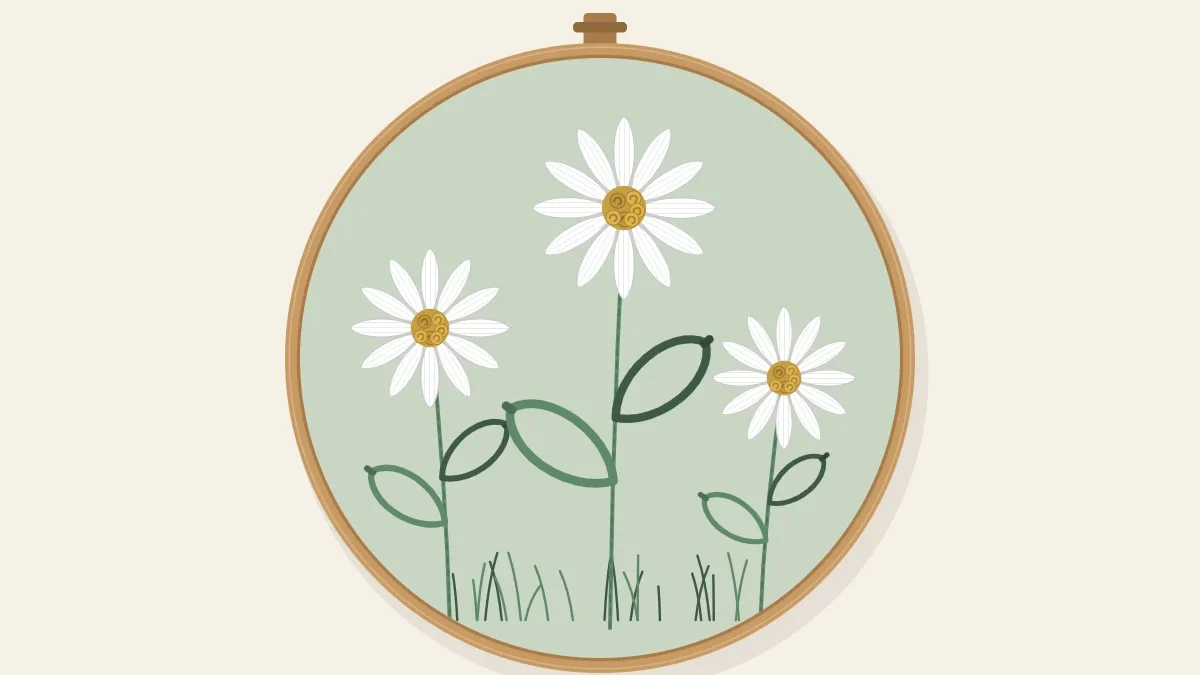
Three daisies with straight-stitch petals, French knot centers and stem-stitch stems. The design is given with measurements so you can draw it straight onto fabric.
Tutorial at a glance
Materials
- Six-strand cotton embroidery floss in white, golden yellow and medium green
- Embroidery needle size 7
- 6-inch (15 cm) embroidery hoop
- 9-inch (23 cm) square of fabric
- Water-soluble pen and a ruler
- Small embroidery scissors
A daisy is built from the three most forgiving stitches in embroidery: straight stitches for petals, French knots for the center and stem stitch for the stalk. Nothing has to be filled smoothly and no two petals need to match, so small wobbles end up looking like a real flower rather than a mistake. This project puts three daisies of different heights in a 6-inch (15 cm) hoop.
Materials and thread plan
Choose a medium-weight, non-stretch cotton or cotton-linen blend in a color, not white. Sage green, soft blue or natural linen all let white petals stand out. Cut the fabric about 9 inches (23 cm) square so there is a margin around the hoop.
| Part | Floss color | Strands | Stitch |
|---|---|---|---|
| Petals | White | 3 | Straight stitch or lazy daisy |
| Centers | Golden yellow | 2 | French knots, two wraps |
| Stems | Medium green | 3 | Stem stitch |
| Leaves | Medium green | 3 | Lazy daisy |
Use six-strand cotton embroidery floss cut to about 18 inches (45 cm) and an embroidery needle size 7 for both the two-strand and three-strand work. Keep needles and small scissors out of reach of children and pets while the hoop is set aside.
Drawing the design
Mark the middle of the fabric with a small dot; every measurement starts from it. Test the water-soluble pen on a scrap of the same fabric first to check that it rinses out.
- Middle daisy. Draw a circle 1/4 inch (6 mm) across with its center 1 1/4 inches (3.2 cm) straight above the dot.
- Left daisy. Draw the same size circle 1 1/4 inches (3.2 cm) to the left of the dot and 1/2 inch (12 mm) above it.
- Right daisy. Draw a third circle 1 1/8 inches (2.9 cm) to the right of the dot, level with it.
- Petal guides. Around each circle draw 12 lines, each 1/2 inch (12 mm) long, radiating outward like the hours on a clock face. Draw the 12, 3, 6 and 9 o’clock lines first, then add two between each pair.
- Stems. From the bottom petal of each daisy, draw a gently curved line down to a point 2 inches (5 cm) below the dot. Let the three stems finish about 1/4 inch (6 mm) apart, with the outer two bowing slightly outward on the way down.
- Leaves. Mark two short lines, 3/8 inch (10 mm) long, on each stem: one about a third of the way up on one side, one about halfway up on the other, each angled upward.
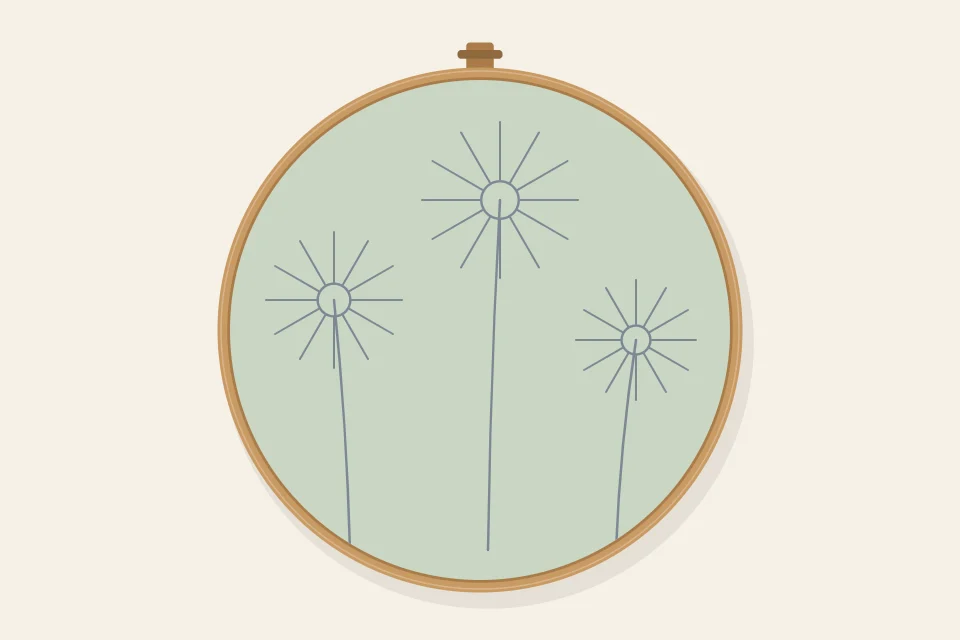
If drawing directly on the fabric feels risky, sketch the design on paper first and trace it using one of the methods in the guide to transferring embroidery designs.
Stitching one daisy in four stages
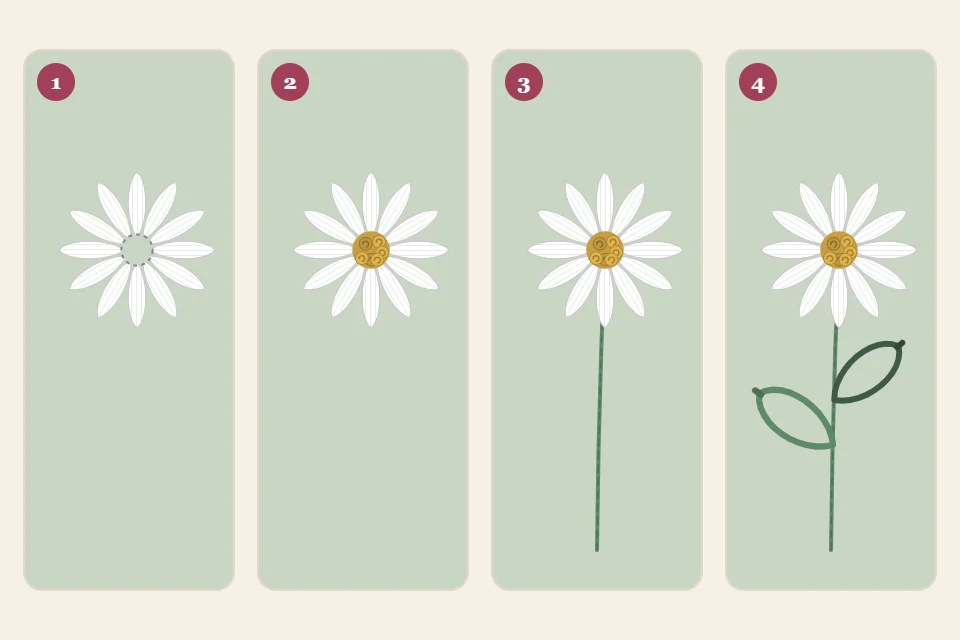
Work each daisy in the order shown in the diagram: petals, center, stem, leaves. Finish one flower completely before starting the next, beginning with the middle one.
- Stitch the petals. With three strands of white, bring the needle up at the outer end of a guide line and take it down at the edge of the center circle. That is one petal. Stitching from the outside in keeps the ragged ends hidden where the knots will cover them. Work the 12, 3, 6 and 9 o’clock petals first, then fill in the rest, so the spacing stays even. Lay each stitch flat without pulling.
- Fill the center with knots. With two strands of yellow, work French knots with two wraps each. Place a ring of knots just inside the circle so they sit over the inner ends of the petals, then fill the middle. A 1/4-inch circle takes roughly seven to nine knots. Remember to go down beside the hole the thread came up through, not into it; the full method is in the French knots tutorial.
- Work the stem. With three strands of green, start at the bottom of the stem and work up toward the flower in stem stitch, with stitches about 3/16 inch (5 mm) long. Keep the working thread on the same side of the needle for the whole line. End by taking the needle down under the tip of the lowest petal so stem and flower connect.
- Add the leaves. Using the same green, make one lazy daisy stitch on each leaf mark: up at the stem, down in the same hole leaving a loop, up at the far end of the mark inside the loop, and a tiny stitch over the loop to hold it.
Lazy daisy petals instead
For rounder, fuller flowers, swap each straight stitch for a detached chain. Come up at the edge of the center circle, go back down in the same hole, bring the needle out at the outer end of the guide line with the thread looped under the tip, and tack the loop down. Two strands of white are enough here, because each petal is a doubled line. Twelve looped petals crowd a small center, so use eight guide lines instead: four at the clock quarters and one between each. The loop is covered in detail in the lazy daisy stitch guide.
Troubleshooting
- Petals bunch on one side. The quarter petals were skipped. Unpick the crowded ones and re-stitch after placing 12, 3, 6 and 9 o’clock.
- The fabric dimples around the center. Twelve stitches pulled tight toward one small circle will gather the cloth. Loosen the tension so each petal just rests on the surface, and check the hoop is drum-tight.
- White petals look thin or gray. Dark fabric shows through sparse thread. Add a second straight stitch right beside each petal, or move up to four strands with a size 5 needle.
- Knots pull through to the back. The needle went down the same hole it came up. Move it one or two fabric threads over.
- The stem looks kinked on the curve. Shorten the stitches to about 1/8 inch (3 mm) around the bend.
Finishing and variations
Rinse out the pen marks in cool water, let the piece dry flat and press it face down on a folded towel so the knots are not crushed. To display the daisies in their hoop, follow the steps for finishing an embroidery hoop.
The same drawing gives a different flower with pale pink or soft yellow petals and a brown center, and making every second petal 3/8 inch (10 mm) long produces a shaggier, more natural head.
Frequently asked questions
Can I stitch daisies on white fabric?
Yes, but white petals will barely show. Switch the petals to yellow, pink or lavender, or outline nothing and choose an off-white fabric with pure white floss for a subtle tone-on-tone look.
How many petals should an embroidered daisy have?
There is no fixed number. Around 12 straight-stitch petals suits a 1/4-inch center, while 8 is plenty for looped lazy daisy petals. A larger center needs more petals to avoid gaps.
Do I have to use French knots for the center?
No. A small circle of satin stitch or a few tiny straight stitches crossing each other will also work. Knots simply give the raised, seedy texture of a real daisy center.
Can I stitch this design on clothing?
Yes, on non-stretch fabric such as a cotton shirt or denim. Keep petals at 1/2 inch or shorter so they are less likely to snag, and secure every thread end well on the back.